
[ad_1]
One frequent error that the majority QuickBooks customers are conscious of is the sending utilization information error in QuickBooks Payroll. To finish the payroll tax filings, QB payroll customers must ship the information to the payroll service, and that is the place they face an error message: “QuickBooks has encountered an issue sending your utilization information.” As soon as a consumer encounters this error, it interrupts the QuickBooks payroll reference to the net service. This error additionally seems when customers attempt to replace payroll, inflicting the method to halt. We perceive how vital it might be to file your taxes on time, and thus, now we have ready a step-by-step troubleshooting technique to get you rid of QuickBooks sending utilization information errors within the shortest time attainable.
In case you Want Fast Help from the QuickBooks Payroll Staff to resolve the sending utilization information error in QuickBooks, then Name Payroll Help Number one.855.738.2784

What Causes Sending Utilization Information Error in QuickBooks
The first causes behind customers encountering QuickBooks sending utilization information error are as follows:
- The time zone in your system is inaccurate.
- You’ll have an accountant’s copy already created.
- Points with the paychecks you’ve got already despatched Intuit could trigger this error.
- An invalid safety certificates may set off this drawback.
- In case you’re sending information in multi-user mode, this error can seem.
- A community time-out could block entry to the server, inflicting the QuickBooks Sending Utilization Information error.
- Normal web connection issues are additionally behind this error.
- Web safety and private firewall settings can set off this concern.
- Inside errors or errors inside the account can set off this error.
- Browser points when going to Intuit websites could trigger this error in QB On-line.
Options to Repair QuickBooks Error Sending Utilization Information
Right here’s how one can resolve the sending utilization information error in QuickBooks:
Resolution 1: Confirm and Set the Date and Time on the Laptop
The inaccurate time zone is the first contributor to the QB sending utilization information error. So, checking and correcting it if it’s unsuitable is essential to resolve the issue:
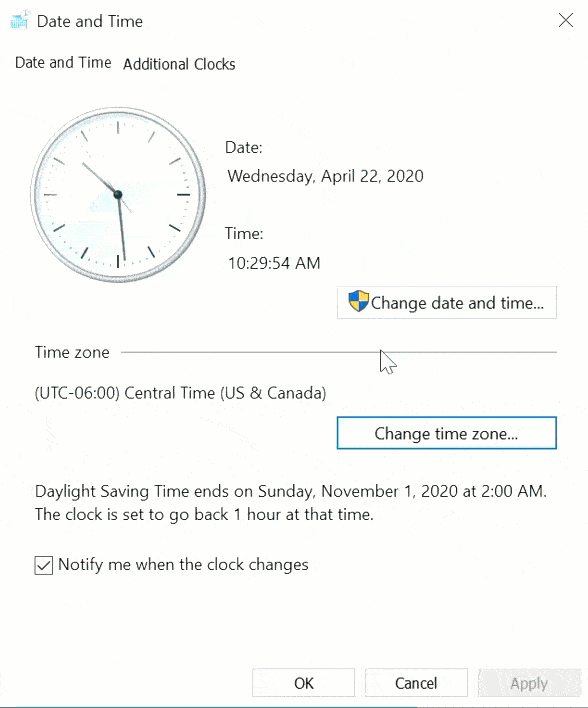
- Proper-click the Home windows Begin menu and faucet the Settings choice.
- Within the Settings menu, faucet the Time & Language choice.
- Navigate to the Date & Time tab inside the Date and Time window.
- Click on Change beneath the Change date and time part.
- Set the correct date and time, and make sure the modifications by choosing Change.
- Confirm the changes by double-clicking the time within the notification space.
Steps to carry out on Home windows Vista and XP
- You’ll be able to see the date and time on the backside proper facet of your laptop desktop, and in case you discover any mistake within the date and time, double-click it and proper the knowledge.
- If there isn’t a choice displayed to vary the date and time, click on the Begin button and select Settings.
- Underneath the Settings, choose Management Panel after which click on Date and Time.
- Underneath the Date and Time window, it’s good to choose the Date and Time choice.
- Now set the right date and time and choose the Time Zone tab.
- Set the right time zone and transfer to the Daylight Saving choice.
- Now, checkmark the Robotically modify clock for daylight saving modifications checkbox and click on OK.
- Now return to the desktop and verify if the right time and date are displayed.
Steps to Carry out on Home windows 7 and Home windows 8
- Press Home windows + R and sort Management Panel within the Run window.
- Press Enter and choose Date and Time.
- In case you are utilizing Home windows 8, choose Clock, Language, and Area and click on Set the Date and Time.
- Now choose Change date and time settings and click on the Date and Time
- Click on the Change date and time choice.
- Now set the right date and time and choose the Change Time Zone tab.
- Choose the Time Zone drop-down menu and choose the right Time Zone.
- Be certain to checkmark the Robotically modify clock for the Daylight Saving Time checkbox.
- Hit OK twice.
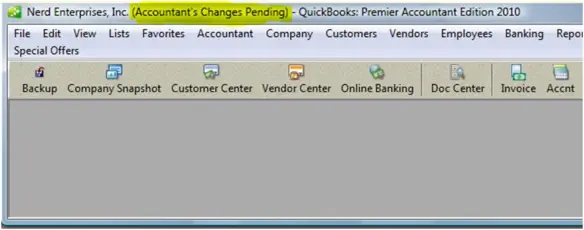
Resolution 2: Look If the Title Bar Exhibits Accountant Modifications Pending
In case you discover “Accountant’s Modifications Pending” within the QuickBooks Desktop title bar, it signifies that you’re working an accountant’s copy of your file. It’s important to attend till your accountant returns the file, or you possibly can take away the restrictions manually.
The guide course of to take away the Accountant’s Copy restrictions is as follows:
- Navigate to the File menu and select the Ship Firm File choice.
- Hit Accountant’s copy, then choose Consumer Actions.
- Select Take away Restrictions.
- Verify your resolution by choosing Sure, I wish to take away the Accountant’s Copy restrictions, after which hit OK.
Nevertheless, it’s essential to seek the advice of together with your accountant earlier than taking this step. Eradicating the restrictions will end result within the lack of any modifications made by your accountant. After resolving this, proceed to ship your payroll information.
Resolution 3: Take away and Recreate Paychecks Caught as On-line to Ship
To allow the sending of utilization information and obtain payroll updates, it’s essential to take away pending paychecks which might be ready to be despatched. Observe these steps to determine online-to-send paychecks:
- Entry Edit after which select Discover.
- Faucet the Superior tab. Entry the Filter field, scroll, and select the next choices:
- Select Element Stage from the Filter listing within the Select Filter part and hit Abstract Solely.
- Return to the Filter listing and scroll all the way down to faucet On-line Standing, then click on On-line to Ship.
- Choose the filter Posting Standing and the Both optionfrom the dropdown menu to the appropriate.
- Faucet Discover within the top-right nook of the Discover Display screen window.
- In case you come throughout any non-payroll transactions, guarantee their processing is completed.
- In case you find paychecks, you’ll have to delete them. Make sure you print a duplicate of the paychecks earlier than deleting them. As soon as the paychecks are eliminated, try to ship zero payroll or utilization information once more. If the method is profitable, attempt recreating the paychecks.
Resolution 4: Strive the Shortcut Keys
Utilizing the shortcut keys will make it easier to resolve the sending utilization information error in QB:

- Press Ctrl + Okay.
- Choose Edit, then Subsequent.
- Hit End.
If this doesn’t repair the problem, transfer high the subsequent troubleshooting resolution.
Resolution 5: Log in as Admin, Replace QuickBooks, Evaluation Paychecks, and Obtain the Newest Tax Desk
You’ll be able to attempt following the sequence of steps beneath to resolve the sending utilization information error in QuickBooks:
- Shut QuickBooks.
- Click on the Home windows menu in your PC. Kind QuickBooks Desktop to go looking, right-click the QB Desktop program and choose the Run as administrator choice.
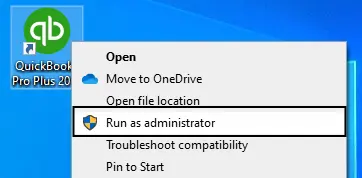
Run QuickBooks as an Administrator
- Now, replace QuickBooks Desktop to the newest model by way of the next steps:
- Faucet Assist in QuickBooks Desktop.
- Choose Replace QuickBooks Desktop.
- Hit Replace Now.
- Then, click on Get Updates and full the set up of updates.
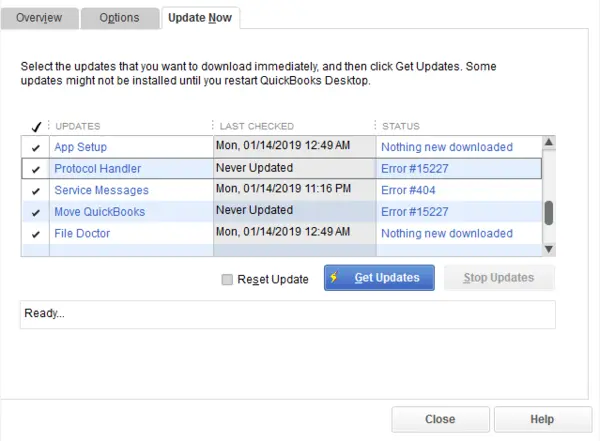
Replace QuickBooks Desktop
- As an alternative of eradicating the uncheck paychecks, toggle them. It includes deleting the earnings objects that you just not too long ago added to the Earnings part:
- Entry the oldest caught paycheck and hit the Paycheck Element button.
- Within the Evaluation Paycheck window, inside the Earnings part, embrace the identical earnings merchandise because the final one listed. As an example, if the final merchandise is “Hourly Fee,” add one other earnings merchandise named “Hourly Fee” to the listing.
- A Web Pay Locked message ought to seem; hit No. Be certain that tax quantities and internet pay stay unchanged and click on OK.
- In case you are prompted with a Previous Transaction message, hit Sure.
- Click on Save & Shut to exit the paycheck and hit Sure to the Recording Transaction warning message.
- Reopen the paycheck, click on the Paycheck Particulars button, and take away the beforehand added earnings objects from the Earnings part.
- Confirm that tax quantities and internet pay are unchanged, then click on OK.
- Repeat these steps for every caught paycheck recognized in Step 2.
- Obtain the newest tax desk updates of payroll as follows:
- Choose the Workers part, then hit the Get Payroll Updates choice.
- Faucet Obtain Total Replace, then hit the Replace choice.
- Search for an info window which seems when the obtain is over.
- Now, let’s ship the utilization information in QB by way of the steps beneath:
- Faucet Workers, then My Payroll Service, and click on Ship Utilization Information. If this feature isn’t obtainable, comply with the steps written beneath.
- Click on Workers after which My Payroll Information.
- Hit the Ship All choice within the Ship/ Obtain Payroll Information window. Enter the payroll service pin if it requests you.
You’ll be able to replace the payroll account info and make sure the sending utilization information error doesn’t seem once more.
Resolution 6: Clear Cache
In case you encounter the sending utilization information error in QBO, you might must verify your browser for an overloaded cache. To remove the cache in Chrome:
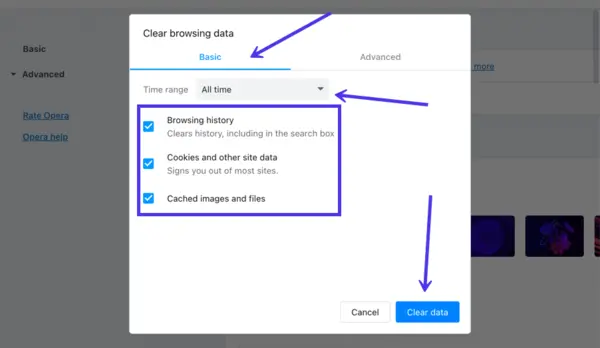
- Hit the Extra icon within the higher proper nook of the Chrome display.
- Select Settings.
- Scroll down together with your mouse to the underside of the web page and click on on Superior.
- Inside the Privateness and Safety part, faucet the Clear looking information choice.
- Tick the field subsequent to Searching Historical past.
- Hit All Time from the Time vary drop-down listing.
- Tick the field in opposition to Cached pictures and information.
- Hit Clear information.
In Microsoft Edge:
- Click on on the three dots icon or Extra Actions and choose Settings.
- Entry the Privateness and Safety tab.
- Subsequent, hit the Select what to clear choice and specify the kind of information you want to delete, akin to Searching historical past, Obtain historical past, Cached pictures, information, and so on.
- Lastly, click on the Clear button.
Resolution 7: Use a Personal Searching Mode
A non-public looking mode may help repair browser points inflicting errors. You should utilize shortcuts like the next:
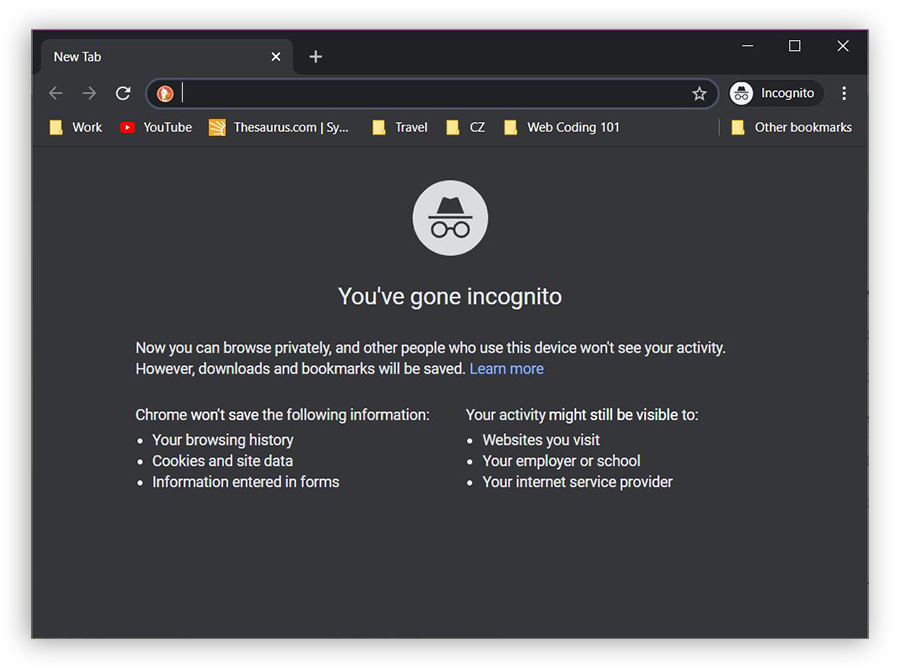
- Safari= Command + Shift+ N
- Microsoft Edge= Ctrl + Shift + P
- Google Chrome= Ctrl + Shift + N
- Mozilla Firefox= Ctrl + Shift + P
Resolution 8: Add Intuit as a Trusted Website
You could want so as to add Intuit as a trusted web site to resolve the browser issues inflicting the utilization information error in QBO:
Embody Intuit in Safari:
- Launch Safari and sort payroll.intuit.com within the deal with bar.
- Press Enter.
- Click on on Bookmarks after which select Add Bookmark.
- From the dropdown, hit Prime Websites beneath Add this web page.
- Click on on Add.
Embody Intuit in Google Chrome:
- Click on on the Customise and Management Google Chrome icon and hit Settings.
- Within the left pane, hit Privateness and Safety, after which click on on Website Settings.
- Faucet Cookies and web site information.
- Within the Permit part, faucet Add.
- Enter *intuit.com and faucet Add to save lots of.
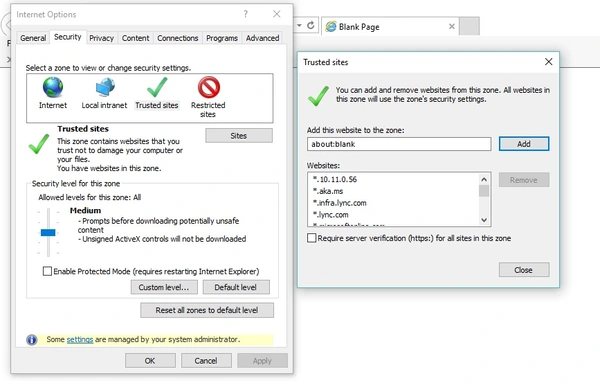
Embody Intuit in Microsoft Edge:
- Navigate to the Management Panel.
- Open Web Choices.
- Select Safety.
- Hit Trusted Websites after which click on on the Websites choice.
- Enter *intuit.com and click on Add to save lots of.
- Choose Shut after which OK.
Resolution 9: Meet System Necessities and Evaluation the Data
Go over the small print you entered in QB and guarantee every thing is so as. Then, log off and again in to reload the information. Double-check that every thing is saved.
Then, meet the system necessities of your QB edition- QBO, QB Desktop, and so on.
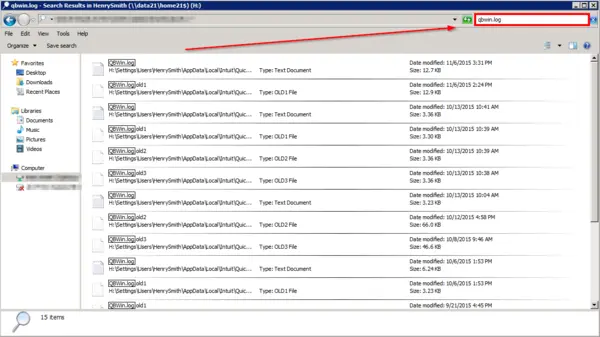
Resolution 10: Entry the QBWin.log file
Search for errors utilizing the QBWin.log file to see what’s inflicting the ship utilization information errors:
Accessing QBWin.go browsing an area laptop could be executed by way of two choices:
Choice 1: Entry the QuickBooks Product Data display
- On the Residence web page, use both F2 or Ctrl+1 to launch the Product Data window.
- Press F3 or Ctrl+2 to launch the Tech Assist window, then navigate to the Open File tab.
- Faucet QBWin.log and click on Open File.
Choice 2: Entry QBWin.log in Home windows
- Use File Explorer to go to the placement of QBWin.log.
- Location: C:UsersYOUR USER NAMEAppDataLocalIntuitQuickBookslogXX.XQBWin.log
- On this path, XX.X represents your QuickBooks Desktop model (e.g., 22.0 for Enterprise 22.0, 29.0 for QuickBooks 2019).
- Tip: Kind %localappdata%IntuitQuickBookslogXX.XQBWin.log in to the deal with bar for faster entry.
To entry QBWin.go browsing Rights Networks or different Hosted Environments:
For QuickBooks Desktop Professional/Premier customers:
- In your Hosted or Terminal atmosphere, search for the Begin menu and choose Laptop.
- Within the search menu, kind QBWin.log (with out urgent Enter or clicking the magnifying glass icon).
- A listing of QBWin.logs will seem, and you must determine the one with the newest timestamp.
For QuickBooks Enterprise Resolution customers:
- Use F2 or Ctrl+1 on the QuickBooks Residence web page to launch the Product Data window.
- Press F3 or Ctrl+2 to launch the Tech Assist window.
- Navigate to the Open File tab, hit QBWin.log, after which select Open File.
For QuickBooks Mac customers:
- Select File after which Shut Firm.
- Maintain command+1 to view Product Data.
- Choose Logging after which Acquire All Logs.
- Entry the zip file in your desktop and double-click it to extract the log information from the folder.
Backside Line
As you possibly can see, troubleshooting the sending utilization information error in QuickBooks and payroll will not be a sophisticated activity, and you might be solely required to comply with just a few easy steps for a decision. Nonetheless, in case you are dealing with the identical error and wish the assistance of an professional, then you possibly can attain us at our Payroll Helpline Quantity 1.855.738.2784.
FAQ’s
Which QuickBooks editions, browsers, and Home windows OS encounter QuickBooks sending utilization information error?
The sending utilization information error in QuickBooks arises within the following editions:
1. QuickBooks Desktop Professional Enhanced
2. QB Desktop Payroll
3. Home windows 10
4. iOS
5. QuickBooks On-line
6. Microsoft Edge
7. QB Desktop Professional 2020
What are the eventualities when QuickBooks sending utilization information error arises?
The QuickBooks sending utilization information error arises as follows:
1. You could get this error even whenever you don’t run payroll together with error PS038.
2. Your payroll replace continues to point an issue even when the subscription is up-to-date and doesn’t allow you to run the replace.
3. You discover difficulties working payroll and calculating taxes due to the unable to ship the utilization information error.
4. Your skill to deal with payroll will get hindered as a result of the payroll utilization information fails to ship to QuickBooks, and this failure is linked to the absence of an replace within the Payroll Account Data. When trying to replace the Payroll Account information, an error stating that the timeframe for this replace has expired, accompanied by error message 40003.
5. The QuickBooks ship to utilization information error arises however choices for contacting help don’t.
[ad_2]